
Technical Information and Tips
Globetracker uses the Google Earth (download version), not Google Earth Web. At the time of this update, Google Earth Web only works with the Chrome browser and also does not have the full features available on the download version. All of our instructions and tips are related to the download version.
Computer configuration • Three tips for using links •
Using the Google Earth Files • New to Google Earth? •
Google Earth Skills You Need to Know • Google Earth Additional things to try
Following Geo and Meri on Twitter
You need the following on your computer to use Globetracker's Mission:
- Some links require Flash (see TF Toolbox). These links will not work on iPads or iTouches.
- Best on a broadband (high speed) connection: DSL, cable modem, or school network
- Google Earth (optional) has additional system requirements and must be installed on your computer. These directions were written for Google Earth versions 6.4 and higher.
Three tips for using links from the Globetracker’s Mission episodes
1. Links within episodes and "Links to Learn More" at the end of episodes open in a new window/tab so you can continue reading the mission and look at the links at the same time. If Geo and Meri have asked questions about what students see in the map, it is best to resize and position the new window so you can see the questions, as well:
2. Some of the links bring up customized Google Maps. These maps include captions and think-aloud questions within the map window. Use the tools within Google Maps to move around (clockwise from top left): Plus and minus to zoom, Map or Satellite buttons to change the view from Hybrid (a combination of both), and a dynamic scale (lower left). 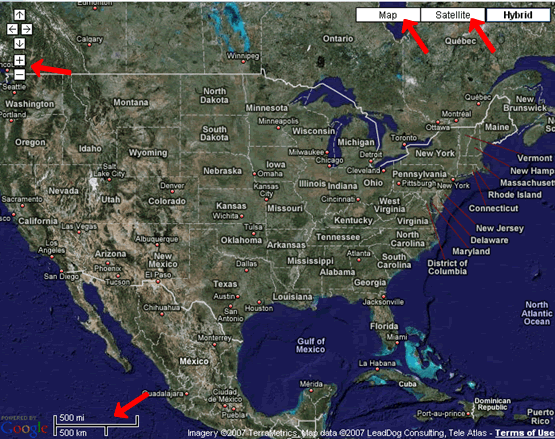
3. The best thing about the Google Maps is being able to "drag" using the little  hand to see what is above, below, left, and right, just as if you were sliding the paper around behind a window opening. This tool is great fun on an interactive whiteboard. Hold your finger on the map and drag...its magic! Have students drag to show you what is north, south, east, and west. They may learn the cardinal directions much more quickly via kinesthetic experience.
Using the Google Earth Files to Follow the Mission
Google Earth Files are linked at the top of each episode page and will launch in Google Earth software. This software is available for free download and installation. The free version of the software works just fine. You can find the detailed system requirements for the software in the Google Earth User Guide.
If you do not have access or expertise to install software on school computers (most teachers do not), be sure to request to have Google Earth installed on at least the computer you use on your projector or interactive whiteboard. Since Google Earth will not run on older or slow machines, you may have to teach the Google Earth portions as a teacher-centered lesson on your one "good" machine. It is worth asking for ---repeatedly! Many schools ask that only one computer per class connect to Google Earth because it draws heavily on the school Internet connection.
You do not need to be an expert to use Google Earth to follow Geo and Meri’s mission.
Google Earth Skills You Need to Know:
- Where to find Navigation controls, Layers, and Places in Google Earth. This Feature Tour gives you a tour of the basic tools. Practice moving between places on the Earth and zooming in using the navigation controls.
- How to set the layers to show - and which ones to choose
- How to play a tour. Watch this video from Google Earth on how to PLAY a tour or read the text directions for Playing Tours (below the video).
- How to work with Globetracker’s Mission placemarkers
Additional things to try:
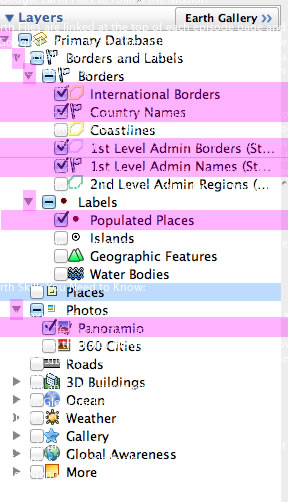
How to set the layers for the best use of Globetracker's Mission:
Open the Layers panel at the left by clicking the triangle if it is not open already.
Use the small triangles at left to open the layers where you want only certain parts of the layer. The triangle will point down when open. Check the boxes so you can see
Borders and Labels
> International Borders
> Country Names
> 1st Level Admin Borders
> 1st Level Admin Names
Labels
> Populated Places
Photos
>Panoramio
This computer will "remember" these layer choices each time you open Google Earth unless you change them.
These are local settings on each machine. Make the layer settings on the machine you will use for class!
As you become more adept with Google Earth (or as your students teach you), you may want to play with other layers as part of class discussions.
back to Google Earth Need to Know
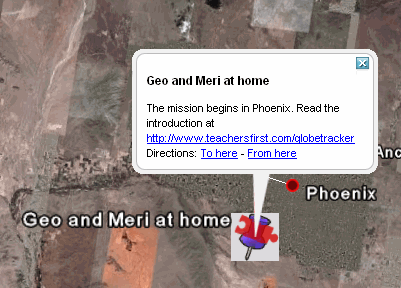
How to work with Globetracker's Mission placemarkers: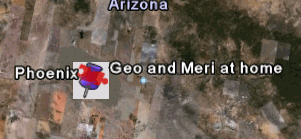
The placemarkers for Globetracker's Mission all have a small, red TeachersFirst puzzle piece on the purple pushpin.
Click on a placemarker to read more about the location:
back to Google Earth Need to Know
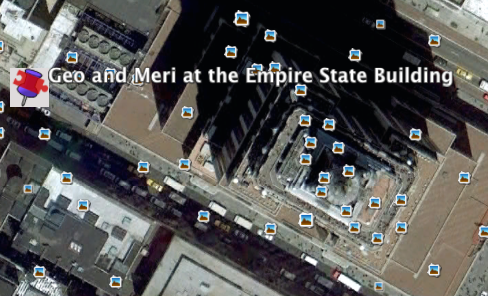
How to view photographs of locations using the Panoramio layer:
If you turned on the Panoramio layer, you can view pictures shared by people around the globe. The photos are visible as small blue photo squares as you zoom in. Click on the square to see the picture taken at that location:
Help your students see more of every place Geo and Meri go by checking out the Panoramio pictures you find near Globetracker's Mission placemarkers.
Help your students see more of every place Geo and Meri go by checking out the Panoramio pictures you find near Globetracker's Mission placemarkers.
back to Additional things to try
Measuring Distances in Google Earth:
You can have Google Earth measure distances between points "as the crow flies" using the Ruler tool available at the top of the Google Earth main screen. 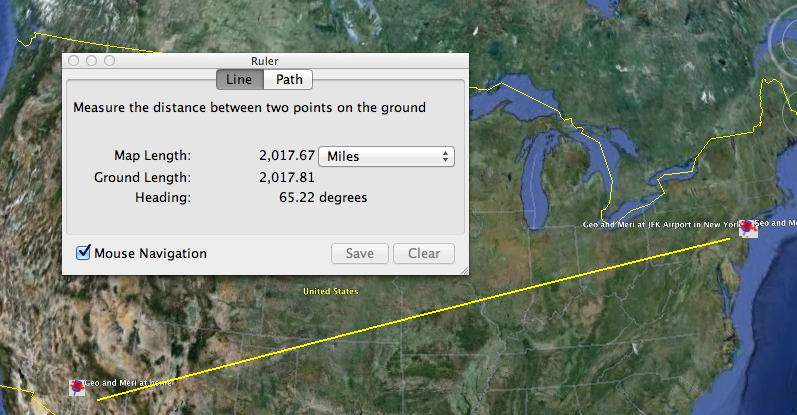 Click the ruler to turn it on. Your cursor will change to a crosshair. Click one location then another to measure the distance between them. The Ruler window that pops in front should be changed to miles or your preferred unit of measurement. Click the CLEAR button in the Ruler window to remove the line and measure something else.
back to Additional things to try
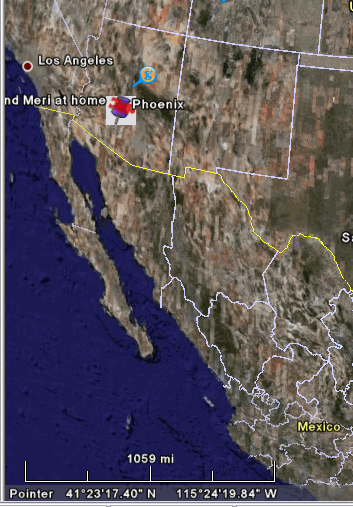
You can turn on a dynamic scale legend to show in the bottom right of the main Google Earth window. Simply go to the View menu and click Scale Legend> The scale will change constantly as you zoom in and out.
Note: For younger students who have not grasped the concept of proportion, this changing scale may be very confusing. TeachersFirst recommends turning it on AFTER you finish zooming in or out.
The Scale Legend is a very simple one with few intermediate markings. If you use it on an interactive whiteboard, you can estimate using the scale, then check your estimate using the Ruler tool to measure distances.
back to Additional things to try
Viewing lines of longitude and latitude:
Google Earth is a wonderful way to reinforce Geo and Meri's explanations of longitude and latitude. To turn on the lines, simply go to the View menu and click Grid. The lines will appear on the main map and stay in place no matter how you zoom or navigate the globe:
. 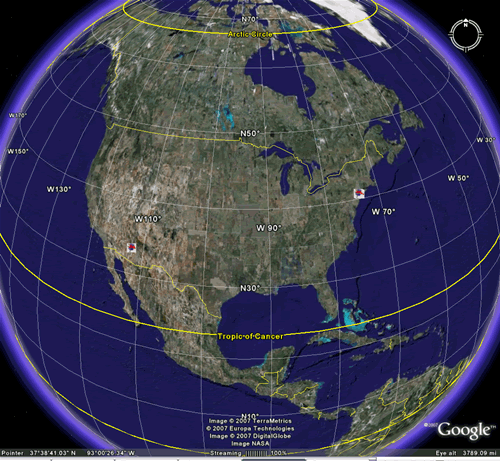
Use this view on an interactive whiteboard and have students use the pens to mark locations by longitude and latitude using the lines. If you click a location, Google Earth will tell you its coordinates. Click a location, then RIGHT click and go to Properties. The full coordinates of longitude and latitude (down to the seconds) will be shown. TeachersFirst's main offices are in a town at Latitude 38°57'8.37"N and Longitude 77°21'22.78"W. Can you find it?
back to Additional things to try
Following Geo and Meri on Twitter
Twitter is a microblogging tool for people to send quick messages ("tweets") about what they are doing, thinking, or learning. Tweets are limited to 140 characters, including spaces! You can learn more about Twitter use in education on this page. Geo and Meri's recent tweets show in the sidebar of each episode. They often tweet during the week when they don't have time to write a whole new post. To follow their tweets without visiting their blog (and to follow others, such as @teachersfirst), you will need a free Twitter account. Many teachers set up a class Twitter account. Once you create an account, follow @SFLGlobeTracker (their Twitter name).
For extra fun, why not log into your class Twitter account and send Geo and Meri a message by specifically MENTIONING them in a tweet. To do this, write a tweet and include @SFLGlobeTracker. Geo and Meri might respond directly to your class. Some examples of tweets Geo and Meri will receive and read:
Did @SFLGlobeTracker find any clues in the museum?
Is it cold where u are @SFLGlobeTracker?
@SFLGlobeTracker Did u go to top of the Empire State bldg?
@SFLGlobeTracker What do homes look like in Peru?
Watch your Twitter account or Geo and Meri's blog posts for responses!